
TL;DR: Bats can squeeze through openings as small as ¼ inch—about the size of a dime. Common entry points include gaps in soffits, fascia boards, ridge vents, gable vents, chimneys, and loose shingles. Effective bat-proofing requires sealing all secondary openings first, then installing one-way exclusion devices at primary exits. Professional exclusion is safest and ensures humane, permanent removal while avoiding maternity season (April through August).
Key Takeaways:
- Bats need only a ¼-inch gap to enter your home
- The 12 most common entry points are roofline gaps, vents, chimneys, and siding crevices
- Seal secondary openings before installing one-way exclusion devices
- Never exclude bats between April and August when young are present
- Professional bat removal ensures safety and compliance with rabies protocols
Table of Contents:
- The Importance of a Bat-Proof Home
- 12 Common Entry Points for Bats
- Priority Checklist: What to Seal First
- Step-by-Step Guide to Professional Bat Exclusion
- Frequently Asked Questions
- Quick Recap
- Free Bat Proofing Quote in Indianapolis
The Importance of a Bat-Proof Home
Discovering bats in your attic is more than just unsettling—it’s a health and safety concern that requires immediate attention. While bats provide valuable pest control by consuming thousands of insects each night, they don’t belong inside your home.
Bat guano accumulates quickly, damaging insulation and creating foul odors. More seriously, bat droppings can harbor histoplasmosis spores, and bats themselves may carry rabies. According to the Centers for Disease Control and Prevention, most people in the U.S. who die of rabies were exposed to rabid bats.
Understanding how bats enter your home is the first step toward permanent, humane removal. Unlike rodents, bats cannot gnaw through building materials to create openings. Instead, they exploit existing gaps and crevices that homeowners often overlook.
12 Common Entry Points for Bats
Bats can fit through openings as small as ¼ inch—roughly the diameter of a dime. Here are the most common places they use to access your home:
1. Fascia Boards Behind Gutters
Construction gaps along fascia boards provide ideal entry points. These intentional gaps improve attic ventilation but create easy access for bats when left unscreened.
2. Loose or Missing Shingles
Damaged shingles near roof edges and gutter lines create small gaps that are invisible from the ground but perfectly sized for bat entry.
3. Ridge Vents
Ridge vents run along the peak of your roof. Even when they appear intact from below, small manufacturing gaps or installation errors can allow bat access.
4. Gable Vents
Decorative gable vents often have wider mesh or deteriorated screens that bats can easily penetrate or squeeze through.
5. Soffits and Soffit Vents
Gaps where soffits meet walls, or poorly fitted soffit vents, are among the most frequently exploited entry points for bats.
6. Roof Returns and Eaves
The junction where porches attach to houses or where dormers meet the main roof often creates small crevices perfect for bat colonies.
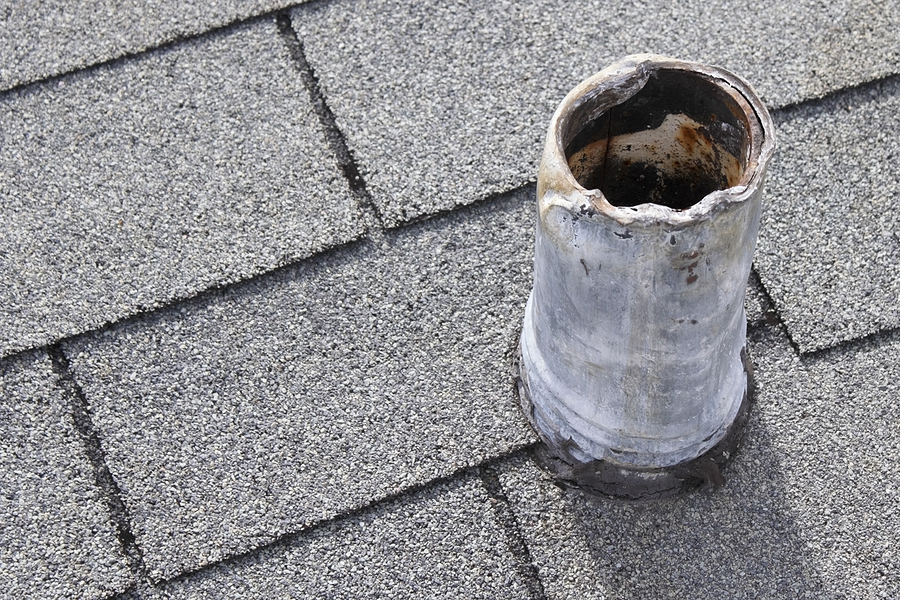
7. Chimneys
Uncapped chimneys or gaps where chimney flashing has pulled away from exterior walls provide protected roosting areas.
8. Behind Shutters
The narrow space between exterior walls and decorative shutters offers darkness and protection that bats find attractive.
9. Siding Corners and Gaps
Cracks where siding forms corners, or where siding meets windows, doors, and chimneys, are common access points.
10. Utility Penetrations
Openings where pipes, electrical wiring, and HVAC lines enter the building often have gaps large enough for bats.
11. Attic Fans and Louvers
Broken screens or gaps around attic fan installations allow bats to enter directly into roosting areas.
12. Damaged Roof Tiles
Broken or displaced clay and concrete tiles create openings where tiles overlap or at the ends of the lowest tile row.
Priority Checklist: What to Seal First
Effective bat exclusion requires a strategic approach. Sealing openings in the wrong order can trap bats inside your home.
Before beginning any exclusion work:
- Inspect your home’s interior for openings between potential roosting areas and living spaces
- Seal these interior gaps first with caulking, weather stripping, or draft guards
- Never seal exterior entry points until one-way exclusion devices are installed
Prioritize sealing these secondary openings:
- Small cracks and crevices less than ¼ inch (use caulk or expanding foam where bats are not active)
- Utility penetrations (fill with steel wool and caulking)
- Gaps around windows and doors (apply weather stripping)
- Broken screens on vents and louvers (replace with ⅙-inch or smaller mesh)
- Loose siding and trim (repair or replace deteriorated wood)
Leave primary exit points open until exclusion devices are installed. These are typically the largest, most heavily stained openings where bats are visibly entering and exiting at dusk.
Step-by-Step Guide to Professional Bat Exclusion
Professional bat exclusion follows a careful, humane process that ensures bats can leave but cannot return. Here are the steps you can expect from a licensed and insured bat removal company:
Step 1: Complete Interior and Exterior Inspection
A thorough inspection identifies all entry points. Professional bat removal services examine the entire roofline, all vents, chimneys, and exterior walls. They also check for dark staining or guano buildup that indicates active bat use.
Step 2: Seal 100% of Secondary Openings
Every secondary gap must be sealed before installing exclusion devices. Missing even one small opening allows bats to reenter after exclusion.
Step 3: Install One-Way Exclusion Devices
One-way valves allow bats to exit but prevent reentry. Common devices include:
- Exclusion tubes: Two-inch diameter, 10-inch long PVC or flexible plastic tubes work for most openings
- Netting valves: Lightweight plastic netting with ⅙-inch or smaller mesh, secured at top and sides but loose at the bottom
- Commercial bat valves: Specialized devices designed for specific entry points
These devices must remain in place for five to seven nights to ensure all bats have exited.
Step 4: Verify Complete Bat Departure
After the exclusion period, professionals observe at dusk to confirm no bats remain. They also inspect the attic for any remaining animals.
Step 5: Remove Devices and Permanently Seal Openings
Once all bats have left, exclusion devices are removed and openings are permanently sealed with caulking, flashing, screening, or hardware cloth.
Step 6: Clean and Sanitize
Professional cleanup removes guano, sanitizes affected areas, and may include attic restoration if insulation is heavily contaminated.
Timing Considerations
Never exclude bats between April and late August. During maternity season, flightless pups cannot exit through one-way devices. Separating mothers from young causes pups to starve and may drive mothers to search for alternative entry points.
The best exclusion window is fall through early spring when bats have migrated or entered hibernation. In Indianapolis, plan exclusions between September and March for optimal results.
Frequently Asked Questions About Bat Proofing
Can I remove bats myself?
While DIY bat exclusion is possible, it requires extensive knowledge of building construction, bat behavior, and safety protocols. The CDC advises avoiding direct contact with bats due to rabies risk. Professional removal ensures humane, effective exclusion while protecting your safety.
How much does professional bat removal cost?
Costs vary based on colony size, number of entry points, and extent of damage. Most Indianapolis homeowners invest between $800 and $2,500 for complete exclusion and cleanup.
Will bats return after exclusion?
When all entry points are properly sealed, bats cannot return. However, if even one small gap remains, bats will find and exploit it. Professional exclusion includes thorough sealing to prevent reentry.
What should I do if I find a bat in my living space?
Never touch the bat. Isolate it in one room by closing interior doors, open windows to allow escape, and contact your local health department. Anyone who may have had direct contact with the bat should seek immediate medical evaluation for potential rabies exposure.
How do I know if I have bats in my attic?
Common signs include squeaking or scratching sounds at dusk, foul odors from guano accumulation, dark staining around entry points, and visible bats flying from your home at sunset.
Are bat houses a good alternative?
Installing a bat house provides bats with alternative roosting habitat after exclusion. Properly placed bat houses benefit your property by maintaining natural pest control while keeping bats out of your home.
Quick Recap:
Key steps for effective bat-proofing:
- Bats exploit gaps as small as ¼ inch—check all 12 common entry points
- Seal interior openings first to prevent bats from entering living spaces
- Close 100% of secondary exterior gaps before installing exclusion devices
- Use one-way valves at primary exits and leave in place for 5–7 nights
- Never exclude bats during maternity season (April through August)
- Verify complete departure before permanently sealing all openings
- Consider professional removal for safety and guaranteed results
Protecting Your Home and Family
Understanding how bats enter your home empowers you to take effective action. While these beneficial animals play an important ecological role, they pose serious health risks when roosting in human dwellings.
Successful bat exclusion requires meticulous attention to detail, proper timing, and adherence to safety protocols. Even small oversights can result in trapped bats, continued infestations, or dangerous human-wildlife encounters.
Need licensed bat removal in Indianapolis? Our certified wildlife control specialists provide humane, permanent bat exclusion with comprehensive guarantees. We handle inspection, exclusion, cleanup, and prevention so you can reclaim your home safely. Contact us today for a thorough inspection and customized removal plan.
Related Post: Common Entry Points for Bats in Your House and How to Seal Them Up